Dates: July 4-6, 2025
Moving upstream from the Hetch Hetchy reservoir where I was just a few months earlier, I spent the long 4th of July Weekend back in Yosemite backpacking the Grand Canyon of the Tuolumne. I invited a friend, and another backpacker I met online tagged along. We left Thursday night to avoid the July 4th traffic and stayed a night in the White Wolf backpacker’s campground. We got there just past midnight and quickly set up wherever we could find space and got to sleep. The weather was calm, with no wind and clear skies, so I cowboy camped under the stars to avoid having to set up my tent.
 |
| Looking straight up at the backpacker's campground. |
Day 1: White Wolf to Pate Valley (10.8 miles, +400 ft, -4,000 ft)
After spending the night in the backpacker’s campground, we drove to the Tuolumne Meadows wilderness center and got our permits. A climber who was staying at the White Wolf campground was also looking to get to Tuolumne Meadows and I gave him a ride since we were headed that way anyways.
With permit in hand, we took YARTs back to White Wolf to start our journey. A couple (hi Thomas and Emily!) was backpacking the same route and took the same YARTs trip as us. We would continue to pass each other back and forth over the next three days.
The first part of the trail was easy going, starting off as a gravel fire road and becoming a normal backcountry trail that gently sloped downwards towards Harden Lake. From here, it became a series of steep switchbacks that descended quickly into the valley, a true test of your knees and ankles. The trail was in relatively good condition, just a little overgrown at first. Halfway down there is a clearing with a good view point of Hetch Hetchy from the back, a familiar but different view from the ones I had when hiking the Hetch Hetchy loop back in May. There were pretty much no mosquitoes along this segment of the trail, and the air kept getting warmer as we descended. We set up camp just past the bridges that cross the river in Pate Valley.
 |
| Hello Hetch Hetchy again! |
 |
| Done with all the switchbacks in Pate Valley. |
 |
| Deep among the trees. |
Day 2: Pate Valley to Waterwheel Falls (12 miles, +3,300 ft)
We had an easy-going morning before heading out for the hardest day of the trip. We meandered through the foliage of the valley alongside the river before climbing around Muir Gorge. We took a long break at the Register Creek crossing, dunking ourselves in the refreshing pool at the base of the waterfall. Many other hikers were stopped here doing the same, filtering water, or just enjoying lunch at the falls.
We had plenty of the time in the long summer day to finish these miles and were in no rush to get to camp. We took another long break right before Return Creek and Waterwheel Falls, dipping into the water again and just chilling on the granite slab by the river.
We camped right above Waterwheel Falls after a little bushwacking to the river shore where we found an existing campsite. The mosquito pressure was mild around here, and we could stay outside without too many issues.
 |
| Waterwheel Falls. |
 |
| Overlooking the falls. |
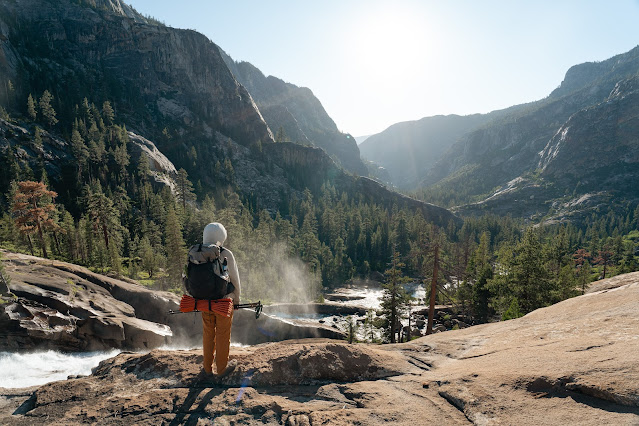
Day 3: Waterwheel Falls to Tuolumne Meadows (10 miles, +1,900 ft)
Waterwheel Falls from yesterday was just the warmup for the main event on our last day. We would be passing more multiple major waterfalls on our climb out of the canyon into Tuolumne Meadows. The views just kept getting better as we got further along the trail, with each waterfall, Le Conte, California, and White Cascade (not to mention all the smaller ones on the side) impressive in their own way. The mosquitoes were the worst on the way to and through Glen Aulin, but nothing that bad.
With pretty much all the climbing done once we reached Glen Aulin, we took a long break at the Glen Aulin High Sierra Camp in front of the White Cascade. I did another quick painting there after soaking my feet in the cold water. The mosquitoes had also mostly dissipated from here on out.
 |
| Hachiware with a new buddy. |
The remaining flat trail through Tuolumne Meadows was just as scenic, and we took one last break on a wide open expanse of flat granite that the river meandered through. Lying bare against the warm rock after dipping into the water was incredibly soothing, and I could have easily fallen asleep there. Alas, I didn’t want to get sunburnt, wanted to eat some fresh food, and also wanted to get back home at a reasonable time, so we got going. After a few quick stops at some of the popular points in the meadows and along Tioga Road, we drove home with another successful backpacking trip done. Thanks again to Arthur and Tommy for the company on this trip. I highly recommend this trail and in this direction; you won’t be disappointed by the views.


