Saturday, November 23, 2024

Point Reyes: Wildcat Camp and Alamere Falls Backpacking (2024)

Dates: November 4-5, 2024 (backdating the publish date for this post to be in order)

This was a quick one night backpacking trip to Point Reyes with some friends, a great introductory backpacking trip and relatively close to the Bay Area. I've backpacked here once before in 2022, going to the Coast campsite for a quick loop in and out. I've also done this loop to Wildcat and Alamere Falls before, but as a day hike and not an overnight trip.

I was looking for permits for a quick backpacking trip for my friends to try out their new gear, and found last minute permits for Site 6 at Wildcat Camp. I quickly realized we were quite lucky with this permit as Site 6 has it's own "private" cliff just a stone's throw away from the campsite where we could watch the ocean from.

Day 1: Palomarin Trailhead to Wildcat Camp

We got started after eating a big lunch of fried chicken and sweet pasta at Jollibee in Hayward (the first time I've ever had it!). The hike in was relatively short and easy so we had plenty of time to get to the campsite.

Sunlight passing through the trees.

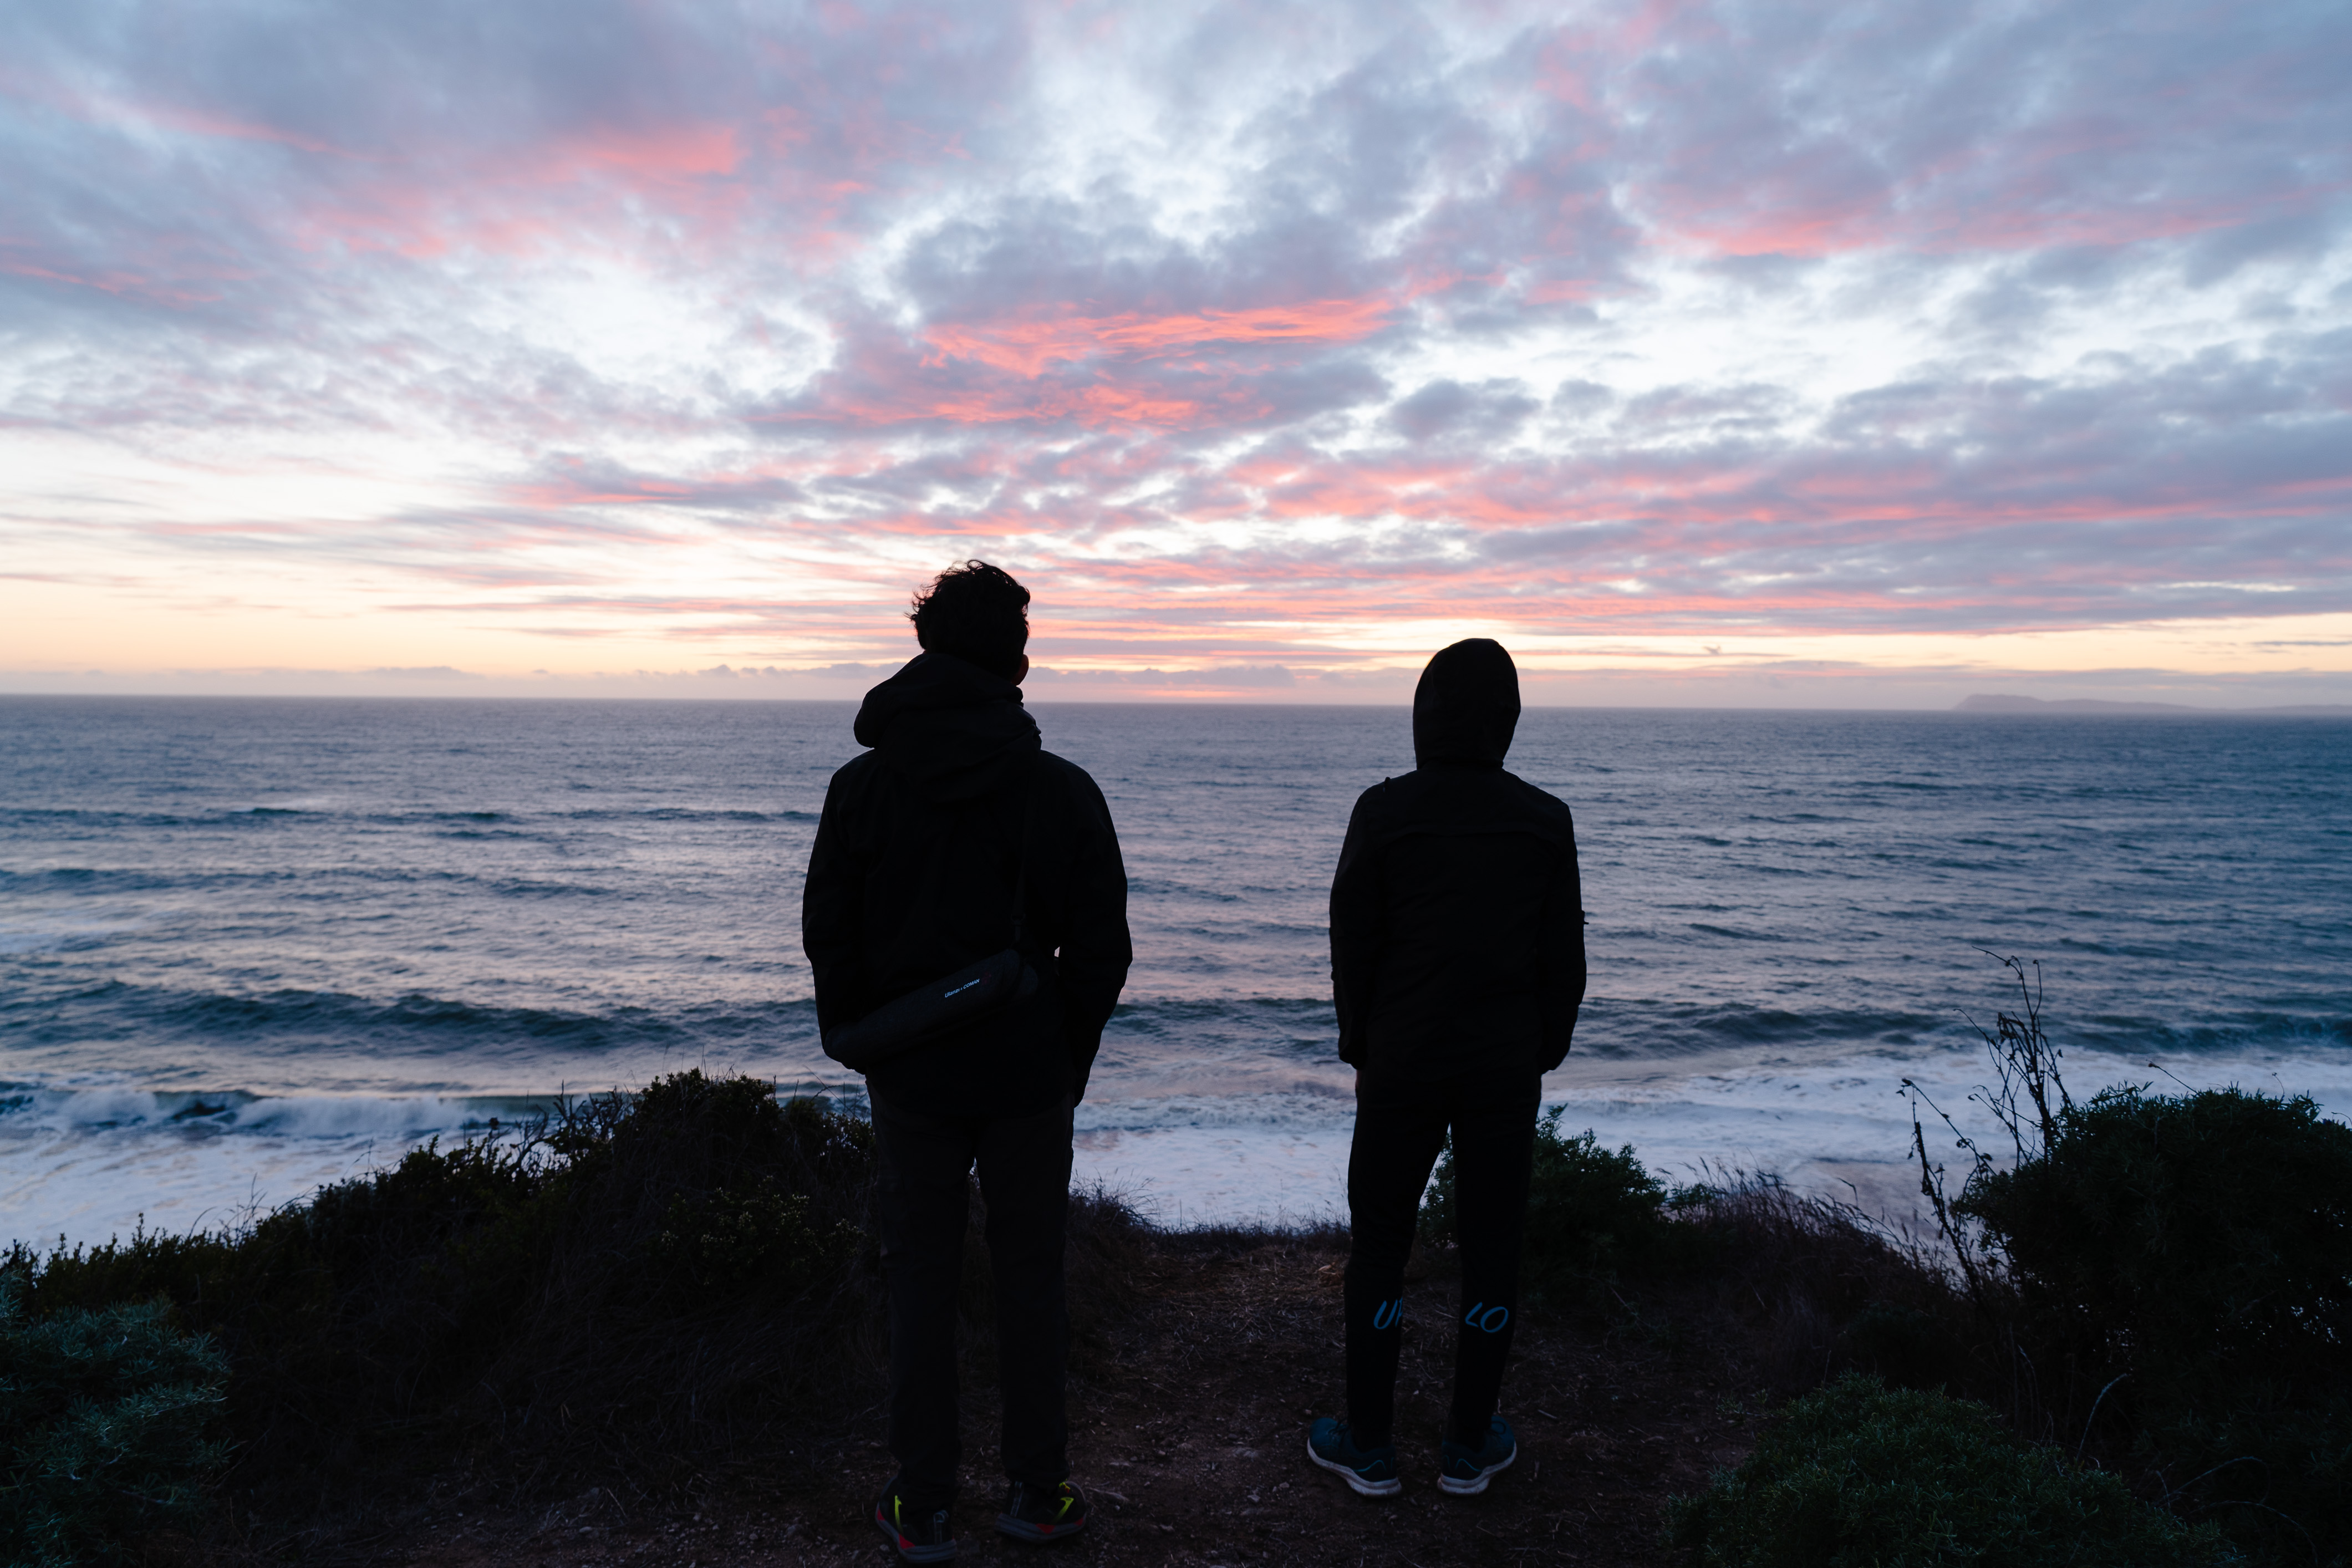
We had a quick snack of Jollibee peach and mango pies halfway through the trail and then got to our campsite with about an hour before the sun set. We quickly deployed out tents and then watched the sunset over the ocean. Having the cliff viewing point right next to our site was super convenient; several other groups came over to also watching the sunset.

The campsite.

As the sun set, the red light on the clouds became increasingly intense and beautiful. Sunsets over the ocean never get old, and being able to stay out to see sunsets and sunrises are part of what make backpacking so special.

Golden light caught in the ocean spray.

The clouds catching the last bits of sunlight.


We made a quick dinner of dehydrated meals and stayed up a bit longer to watch the stars and do some astrophotography.

Long exposure over the ocean.

Saturday, October 26, 2024

Summer Backpacking: Yosemite and Kings Canyon (2024)

This was originally going to be a longer post, with each day of backpacking written out in a more narrative format but many months have passed since I started the draft and I'm not sure I will have the time to really write this out. For now, just to get something out, I'm going to bullet-point out the main things I remember from each trip and call it a day.

Yosemite: Snow Creek to Mt. Watkins, Cloud’s Rest

  • July 19-21, 2024
Day 1: Mirror Lake up Snow Creek, to Mt. Watkins (9 miles, 4,900 ft elevation gain)
  • First multi-day backpacking trip I've ever gone on, and last backpacking trip was back in 2022.
  • Was originally supposed to go with co-workers but they had to back out of the trip a week before; I decided to go anyways since I could get a permit
  • Drove into Yosemite from the bay the morning of, starting at 5AM
  • Got permit and started hike around 9:30 AM, I really wanted to get moving as quickly as possible to beat the heat; it was supposed to be 100F in the valley in the afternoon. I hiked about 1.5 miles extra from the parking lot to the Wilderness Center, but caught a bus to the Ahwahnee to start the hike.
  • Heading up Snow Creek trail in the heat was not easy. I should have drunk more water on the way up and at the stop at the creek bridge; I was definitely dehydrated in the last day. No reason not to drink more water when there are so many sources!
  • Ate lunch at the Snow Creek bridge and soaked my feet in the creek. Don't let your feet soak for too long if you still have hiking to do!
  • Camped at the top of Mt. Watkins and had a burst of hail before the sun set. Then all calm and clear through the night.
  • Could barely sleep for some reason, only really got an hour or two of good sleep near the end. Probably nervousness.
Climbing out of the valley on the Snow Creek trail.

Top of Mt. Watkins

Small hail storm before sunset.

Full moon at night.

The next morning.


Day 2: Mt. Watkins to turnoff past Cloud's Rest (12.2 miles, 3,100 ft elevation gain, 2,600 ft elevation drop)
  • Surprisingly not tired in the morning
  • Hiked to Tenaya Lake and got more water and went for a short swim
  • Pretty much no mosquitoes. I was here a month before to day-hike Cloud's Rest with friends and the mosquitoes were pretty much hell on earth. I had easily more than 30 bites per arm.
  • Went over Cloud's Rest, had lunch at the top, and then headed down a bit to my next campsite. I could have definitely made it all the way back to the valley the same day, but my trip was supposed to be multiple nights. :)
  • Again, I had trouble sleeping but didn't feel tired. Saw some people hiking up to Cloud's rest at night, which is honestly a great idea to avoid the heat of the day
  • Could see the headlamps of people going up Half Dome in the early morning
Lake Tenaya

Sunset and Half Dome.

Hikers summitting Half Dome before sunrise.

Day 3: Turnoff from Cloud's Rest to Happy Isles (8.5 miles, 5,600 ft elevation drop)
  • Definitely should had drunk more water the previous days, was feeling dehydrated in the morning
  • Booked it down to the Cloud's Rest/JMT junction to refill on water at Sunrise Creek
  • Had very normal descent into the valley via the Mist Trail, saw one rattlesnake on the way down from Nevada Falls.
  • Ate the Curry Village pizza and had an ice cream at the end :)
  • Quick swim in the Merced river to cool down from the afternoon heat and then drove home

Kings Canyon: Rae Lakes Loop

  • August 9-11, 2024
Day 1: Road's End to Woods Creek/JMT (15 miles, 4,600 ft elevation gain)
  • Realized I forgot my hiking poles the night before when I reached Fresno. I was able to buy a set at Walmart the morning I headed out to the trailhead.
  • Reached Road's End and got my permit after listening to the ranger's bear warnings.
  • Started my hike around 9:30 AM; wasn't sure if I was going to stop at the South Fork of the Kings River crossing at Upper Paradise Valley, or make it to the JMT Woods Creek bridge
  • Ate the first quarter of my sandwich about 8 miles in. I just wanted to keep climbing up higher to escape the heat. Saw one rattlesnake during this segment.
  • Got to the South Fork of the Kings River crossing around 2PM and ate another quarter of my sandwich. Decided to push on to the JMT crossing.
  • After about 15 miles for the day, and I was ready for a rest. The campsites around the bridge were quite nice. and there was a bear box I could put my bear can into. There were many other campers there, either doing the JMT or the lake loop. I ate the last half of my sandwich and washed off in the river. It was still hard to fall asleep; not sure why.
Start of the hike from Road's End.

The Sphinx in the distance.

Brought along Chiikawa again for this hike.

Wood's Creek bridge crossing. Fun bridge to walk on.

First night's camp.

Thursday, September 26, 2024

Monday, February 20, 2023

Photos of 2022

With another year gone, it's time for another recap. I think 2022 has been the year I've taken the most photos.

Clouds 2


Sunset


Antelope Canyon


Stargazing


Purisma

Tuesday, July 26, 2022

Microphone Amplifier: Shielding

My friend owns a ribbon microphone, which have notoriously low output levels even after their internal transformers steps up the output, and always need to crank the gain up to the max and use noise reduction to get anything usable. A common solution is to use an in-line preamp such as the Cloudlifter and the FetHead. I wanted to see if I could make my own amplifier after seeing a small snippet on ribbon microphone amplifiers in the Art of Electronics

After a little bit of Googling, I came across reverse-engineered schematics for aforementioned amplifiers. They both use JFETs in a differential pair, which allow for the gates to be biased at 0V straight from the microphone, and are powered directly off of phantom power with the phantom power resistors as the load. The Cloudlifter has a cascode configuration of JFETs, while the FetHead is just a single device. Someone already made a FetHead clone, and to keep my project simple I essentially cloned this. I added a few changes to my PCB:

  • Added a footprint for a two channel ESD diode device
  • Added places for emitter degeneration resistor if one wants to add them
  • Used the connector that has the shield separated from ground both the input and the output XLRs
    • Added jumpers that allow for configuration on how the shields are connected to each other/to ground
I was really interested in seeing how to properly shield the amplifier and the effects of grounding the shielding at the amplifier versus not. From several videos I watched on connecting up the shield in general for cables (not just audio and XLR), the idea is to form a continuous Faraday cage to keep out noise. You want all the shields joined through the cable to the chassis of all the devices in line. Whether you ground this shield at all points vs just at one point or only to earth or not at all (no DC connection but AC coupled) I'm still not clear on. With all the jumpers I wanted to test what happens under different conditions.

KiCAD Schematic.

I sent the boards out to made and ordered the parts from Mouser. A week later, everything showed up at my door and I filmed a making-of video just for fun:

I still got the footprint wrong for the ESD diode; I originally chose a SOT-23 part but changed to a lower voltage part just before sending out the design and forgot to change the footprint for SOT-523. Thankfully the part still soldered into place without much issue.

PCBs.

Parts.

Assembled.

The metal box I originally thought of putting the amplifier into ended up being just a little smaller than I thought, causing some interference with the connector screw holes. For now there is no enclosure, making proper shielding tests impossible. However, I can still generally test the amplifier. I handed off the amplifier to my friend and we saw significant gain (I don't really have any equipment setup to do a proper measurement of the absolute gain at home anymore and definitely don't have any to do a portable measurement.). There was very audible noise when there was supposed to be no sound but we'll need to figure that out another time. Some initial experiments with joining the shields on the board and to the ground gave inconclusive results along with a jank foil shield. The cable being used is also of questionable quality.

Sunday, June 12, 2022

CAD Practice: Mini Tripod

It's been awhile since I've done some real CAD work, so I decided to model a mini tripod that I regularly use. The legs have interesting geometry with smooth contours that were difficult for me to capture in CAD. 
Orthographic side view.

I still am not sure what is the best way to model these smooth contours; I initially started off by drawing a top-down view of the leg, thinking I would then extrude this profile and then cut it from the side with another profile like I did for the glasses I previously modeled. I quickly realized this would not work that well since the legs don't have parallel sides.

I backtracked and then decided this would have to be done with lofts. Using the top-down sketch as a guide, I created several cross-section profiles along the leg for the loft to follow and then created the leg out of two lofts. The modeled leg is definitely not perfectly accurate to the real leg as the real one has a smoother curve along the entire outer face and pinches in faster on the inner face. If I were to do this again I would use 3D curves and guide each edge with a rail. Also, at the hinge the curve should be more gradual and not bend in as quickly.


The bevel at the bottom of the leg is also too steep, but this was necessary for the bevel to line up with the tip of the leg and the outer edges. As a result, with the legs all the way out the bottom of the legs are still not parallel with the ground.

A video of the modelling process:


And a render:

Nice render with the tripod open.

Tuesday, May 3, 2022

iCE40 FPGA Tinkering

After my very short experience with getting the Vivado toolchain setup to use the the Pynq FPGA board a few years ago, I've decided to get back into doing some projects with a FPGA again. I only ever got around to blinking an LED before putting the board aside; I had no solid projects in mind to make. The only reason I tried using it was that I was able to get one for free and it is the board used in the digital design class at Berkeley. I know it is a very powerful device and has lots of nice peripherals directly on the board so I may come back to it in the future. (Most digital design time is really spent in simulation anyways so the exact hardware doesn't matter that much.)

But man, the complete Vivado toolchain is nearly 80GB installed, and the bloat of everything with respect to it did not sit nicely with me. So recently I set out to find a different FPGA with a nicer ecosystem. From other projects I've seen online the first one I looked into and eventually settled on was the Lattice series of iCE40 FPGAs. The configuration bitstream has been reverse-engineered and a series of open-source tools have been developed for using these iCE parts. Synthesis, place-and-route, and bitstream generation all can be done through some simple steps. (Most other FPGAs still have locked down bitstreams and is why you need to use vendor-specific tools to do the synthesis and place-and-route. Being tools that are developed by large corporations with lots of money, they may/probably have better outputs from these steps (e.g. more optimized synthesis, better place-and-route of logic cells for better timing, etc.).)

I picked up a UPduino board with its iCE40-UP5K FPGA and installed the APIO ecosystem for the development and build toolchain. APIO makes it super convenient to develop for these FPGAs as it bundles together all of the open source tools.

General setup process (so I don't forget it; recently I had to re-lookup how I setup my STM32 toolchain back in 2018 so if I wanted to use them for a real project I would be able to):

  1. Install APIO
  2. Generally followed this guide.
  3. Initialize project with apio init --board iCE40-UP5K -s
    1. -s allows us to customize the SConstruct file so that we can the build process look into subdirectories for the source files.
  4. For simulation use apio sim
    1. Simulates from *_tb.v files
  5. apio build to build the verilog
  6. For some reason apio upload would not work for me; I suspect there is a PATH problem with my python setup (error: 'WindowsPath' object is not iterable)
    1. I just manually uploaded with iceprog -I A [path to bitstream]
Within minutes I had some blinky LEDs going current controlled by the internal LED peripheral, and running a simulation was relatively straightforward. Next steps are generating PWM and then maybe generating some VGA signals. Still not sure if this the best platform to be using but for small projects the simplicity is nice.

Aside: Some time ago I had did about a day's worth of tinkering with Verilog and getting simulation setup with iverilog and gtkwave after reading blog posts on zipcpu and gaining some interest in HDL again. Getting everything setup on Windows is slightly annoying with all the random things on my path and multiple terminal and shells installed over the years (got the windows CMD, git bash with mingw, msys2, and cygwin).